Loading... (Warehouse Local Time)
Mon–Fri: 9:00 AM – 6:00 PM |

Ruby Green Pixel Honed Marble Mosaic Tile – Bold Natural Elegance

The Ruby Green Pixel Honed Marble Mosaic Tile combines bold style with natural elegance. Its rich green hues and subtle veining are enhanced by a soft honed finish, creating a sophisticated matte look that adds depth and character to any space. Perfect for kitchens, bathrooms, backsplashes, shower walls, and accent features, the pixel-style mosaic allows for versatile design and easy installation. Crafted from premium marble, it is durable and long-lasting, making it an ideal choice for homeowners and designers seeking a striking, contemporary statement with timeless appeal.

$19.49 / Piece

Item Code: MM130-24150 Category

540 Pieces in stock

Est. Coverage: 0.86 sq. ft. per piece   |   8.60 sq. ft. per box   |   464 sq. ft. per crate   |  Request Info
Note on Samples:
Sample pieces are small cut sizes, approximately 3" x 3" to 8" x 8", and intended for color and finish reference only.
If you need a full-size sample, please contact us.

Request Custom Pricing for Large Orders

Planning a large project? Orders over 500 sq. ft., full crates, or commercial applications may qualify for exclusive volume pricing. Reach out today and let us provide a custom quote tailored to your needs.

Request Volume Quote
  • Volume pricing available for qualified bulk orders.
  • We offer custom sizes, finishes, and crate-based shipments.

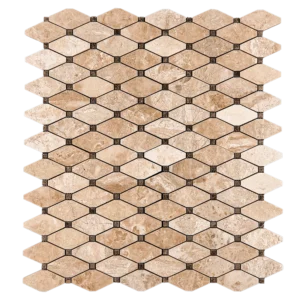
Ruby Green Pixel Honed Marble Mosaic Tile – Contemporary Elegance

The Ruby Green Pixel Honed Marble Mosaic Tile brings a striking combination of natural beauty and modern design to any interior. Its soft honed surface accentuates deep green hues and subtle veining, delivering a matte, refined finish that enhances light and texture.

Ideal for both residential and commercial applications, this mosaic tile transforms spaces such as:

  • Kitchen backsplashes with a sleek, contemporary look

  • Bathroom walls and shower floors for a serene, spa-like feel

  • Accent walls in living areas or offices that demand visual impact

  • Fireplace surrounds with elegant, timeless appeal

The pixel-style format allows for precise alignment and smooth installation, while the honed finish minimizes glare and emphasizes the marble’s natural richness. Crafted from premium marble, Ruby Green Pixel Mosaic Tiles combine durability with sophistication, making them a versatile and long-lasting choice for interiors seeking bold style and lasting beauty.

Weight4 lbs
Dimensions10.4 × 12 × 0.40 in
Color

Finish

Thickness

Size (inches)

Design

Pixel

Material

Usage Area

Backsplash, Commercial Interior Walls, Outdoor Walls, Residential Interior Walls, Shower Walls

Installation Guide – Ruby Green Pixel Honed Marble Mosaic Tile

Material Overview

  • Material: Natural green marble with a honed (matte) finish.

  • Format: Small “pixel” chips, mesh-mounted on approx. 12″x12″ sheets (some lots may be paper-faced).

  • Note: Green/serpentine marbles can be moisture-sensitive; refer to the Adhesive section to prevent curling/warping.

  • Applications: Walls, backsplashes, shower walls/floors, and light residential floors. Multiple grout joints improve slip resistance.


Step 1: Surface Preparation

  • Substrate must be clean, dry, rigid, and flat (≤1/8″ in 10′); skim-coat or patch if necessary.

  • Approved substrates: cement backer board, cured concrete, or ANSI-compliant mortar bed.

  • In wet areas, install ANSI A118.10 waterproofing; shower floors require ¼” per foot slope.


Step 2: Dry Layout & Sheet Planning

  • Blend sheets from multiple boxes to distribute natural shade variation.

  • Snap level reference lines and confirm sheet orientation (check arrows on mesh back if present).

  • Trim mesh edges and stagger sheet seams for seamless honeycomb alignment. Pre-fit around outlets and edges.


Step 3: Adhesive Selection (Moisture-Sensitive Marble)

  • Recommended: 100% solids epoxy mortar (ANSI A118.3) to prevent curling/warping.

  • Alternative: Rapid-setting, low-water, polymer-modified thin-set (ANSI A118.15) labeled for moisture-sensitive stone (jobsite mockup recommended).

  • Avoid premixed mastic and prolonged water exposure during installation or cleaning.


Step 4: Trowel & Adhesive Application

  • Use 3/16″ V-notch (or 1/4″x3/16″ V-notch) trowel on flat substrates.

  • Key in with flat side, comb in one direction, and lightly flatten ridges to prevent telegraphing through small chips.

  • Work in sections you can cover in 10–15 minutes to avoid skinning (shorter for epoxy/rapid-set).


Step 5: Setting the Mosaics

  • Place sheets along reference lines; press in using a rubber grout float or beating block for full contact and a level surface.

  • Lift/adjust immediately if lippage occurs; back-butter individual chips if needed.

  • Clean excess adhesive promptly with a barely damp sponge or microfiber, minimizing water.

  • For paper-faced sheets: press paper-side out, lightly wet after initial grab (≈10–20 min), then remove paper and true up joints.


Step 6: Cutting & Detailing

  • Cut with a wet saw and continuous-rim diamond blade suitable for marble; tape cut lines to minimize chipping.

  • For small trims, use mosaic nippers sparingly; smooth edges with a rubbing stone.

  • Finish exposed edges with stone trim, metal profiles, or coordinating moldings.


Step 7: Grouting

  • Allow adhesive to cure (≈24 hours for cementitious; follow label for epoxy/rapid-set).

  • Use unsanded grout for joints ≤1/8″; for wider joints, select fine-aggregate, marble-safe grout and test first.

  • Apply grout release or pre-seal on dark green marble to reduce staining or haze; always perform a mockup.

  • Pack joints diagonally with a rubber float; clean with minimal water. Avoid acidic haze removers.


Step 8: Sealing

  • After grout cures (≈72 hours), apply a penetrating, breathable sealer suitable for marble and grout.

  • Re-seal periodically (every 1–2 years) depending on exposure and usage.


Maintenance

  • Clean only with pH-neutral, non-abrasive stone cleaners. Avoid acids, vinegar, bleach, or abrasive pads.

  • In showers, wipe or squeegee after use to prevent mineral buildup. Use marble-safe scale removers if needed.


Movement Joints

  • Follow TCNA EJ171 for structural and soft joints at perimeters, changes of plane, and large expanses.

  • Use 100% stone-safe silicone in corners and where tile meets dissimilar materials.


Important Notes & Disclaimer

  • Conduct a moisture sensitivity test (24-hour damp piece) before installation. If curling/warping occurs, use epoxy mortar and consider epoxy grout.

  • Natural marble varies in tone, veining, and thickness—dry-lay and blend sheets before setting. Expect slight tolerances typical of mosaics.

  • Stonemarket USA is not responsible for substrate issues or improper installation. Professional installation is recommended.

Category
Category
Material
Material
Color
Color
Size
Size
Finish
Finish
Design
Design
Thickness
Thickness
Application
Usage Area
Request a Quote
Tell us briefly about your project, sq ft, and timing.