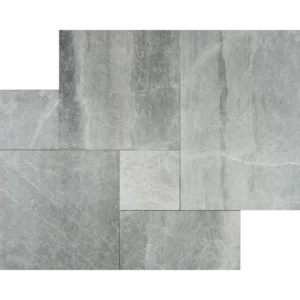
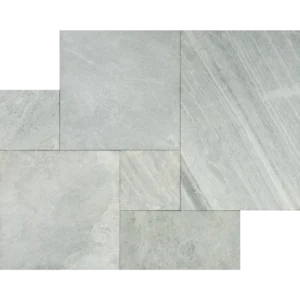
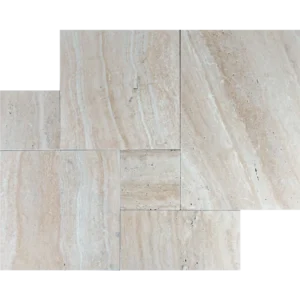
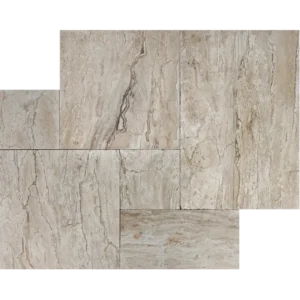
Silver Canyon Tumbled Travertine Paver – French Pattern Elegance
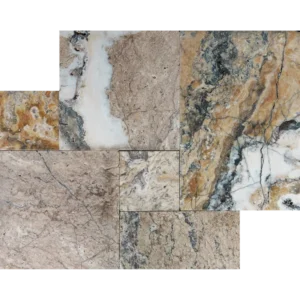
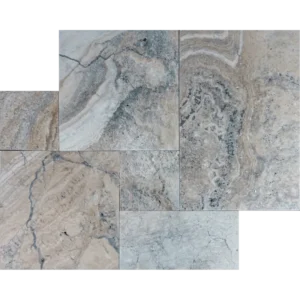
Bring natural sophistication to your outdoor spaces with the Silver Canyon Tumbled Travertine Paver. This paver features a striking mix of gray, taupe, charcoal, and subtle beige hues, showcasing the organic patterns of travertine that create depth and visual interest. Its tumbled finish softens edges, offering a rustic, weathered look while providing natural slip resistance, perfect for high-traffic exterior areas.
The classic French Pattern layout adds timeless charm and movement, making it ideal for patios, pool decks, walkways, and garden terraces. Each set is thoughtfully designed to create an elegant, cohesive surface with a balanced mix of large and small pavers.
French Pattern Set Composition:
(2) pcs – 16″ x 16″
(1) pc – 16″ x 24″
(1) pc – 8″ x 16″
(2) pcs – 8″ x 8″
Product Highlights:
Premium travertine with a natural blend of silver, gray, and taupe tones
Tumbled edges for rustic texture and natural slip resistance
French Pattern layout for a timeless, flowing design
Durable 1-1/4″ thickness for long-lasting outdoor performance
Ideal for patios, pool decks, walkways, and terraces
Sold in French pattern sets (8 sq. ft. per set) – 22 sets per crate (176 sq. ft.)
This Silver Canyon paver transforms any outdoor project with natural beauty, elegance, and durability — a perfect blend of style and function.
Installation Guide – Silver Canyon Tumbled Travertine Paver (French Pattern)
Follow this step-by-step guide to achieve a professional, long-lasting installation of your Silver Canyon Tumbled Travertine Pavers.
Step 1: Site Preparation – Solid and Level Base
Clear the installation area of debris, vegetation, and old paving material.
Ensure proper drainage; the base should slope slightly (1/4″ per foot) away from structures.
Compact the soil or sub-base to create a stable foundation.
Step 2: Base Layer – Sand or Gravel Foundation
Spread a 4–6″ layer of crushed stone or gravel.
Compact each layer with a plate compactor for stability.
Add a 1″ layer of coarse sand or stone dust on top of the gravel to create a smooth bedding surface.
Step 3: Layout Planning – French Pattern Alignment
Dry-lay the pavers in the French Pattern to preview placement and ensure consistent color flow.
Start from a corner or center point, maintaining alignment and spacing.
Adjust pattern as needed to avoid small cuts along edges.
Step 4: Laying Pavers – Placement and Leveling
Place each paver onto the sand base, gently pressing to seat it firmly.
Maintain 1/8″–1/4″ joints between pavers for natural movement and grout or sand filling.
Use a rubber mallet to tap pavers into level alignment.
Check frequently with a level to ensure a flat, even surface.
Step 5: Cutting & Adjustments
Use a wet saw with a diamond blade to cut pavers for edge fits and corners.
Smooth cut edges with a stone file or grinder for a natural appearance.
Dry-fit all cut pieces before final placement.
Step 6: Joint Filling
For dry-set patios or walkways, sweep polymeric sand into the joints.
For mortar installations, fill joints with a sand-cement mix or thin grout compatible with natural stone.
Compact the sand or grout into joints and remove excess from the surface.
Step 7: Compaction & Stabilization
Step 8: Sealing (Optional but Recommended)
Apply a high-quality natural stone sealer to protect from stains, water, and UV damage.
Allow 24–48 hours for full curing before use.
Maintenance Tips
Sweep regularly to remove dirt and debris.
Wash with pH-neutral cleaners; avoid acidic or harsh chemicals.
Reapply sealer every 1–2 years to maintain durability and appearance.
Important Note:
Silver Canyon travertine is a natural stone; variations in color, texture, and veining are normal. Dry-lay and mix pavers from multiple boxes to achieve the most visually balanced result. Proper substrate preparation ensures longevity and performance.