Loading... (Warehouse Local Time)
Mon–Fri: 9:00 AM – 6:00 PM |
Sale!

Iceberg & Dolomite Rio Polished Marble Mosaic Tile – White Elegance

Elevate your space with the Rio Polished Marble Mosaic Tile in Iceberg & Dolomite. Featuring bright white tones and a sleek finish, it’s perfect for kitchens, bathrooms, and feature walls.

Original price was: $46.25.Current price is: $36.99. / PieceSave 20%

Item Code: MM124-18832 Category

720 Pieces in stock

Est. Coverage: 0.86 sq. ft. per piece | 4.31 sq. ft. per box | 310 sq. ft. per crate | Request Info
Note on Samples:
Sample pieces are small cut sizes, approximately 3" x 3" to 8" x 8", and intended for color and finish reference only.
If you need a full-size sample, please contact us.

Request Custom Pricing for Large Orders

Planning a large project? Orders over 500 sq. ft., full crates, or commercial applications may qualify for exclusive volume pricing. Reach out today and let us provide a custom quote tailored to your needs.

Request Volume Quote
  • Volume pricing available for qualified bulk orders.
  • We offer custom sizes, finishes, and crate-based shipments.

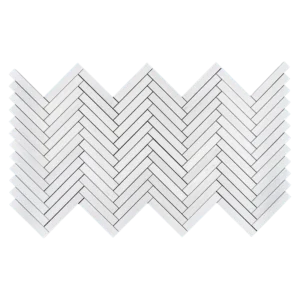
Rio Polished Marble Mosaic – Iceberg & Dolomite
Modern Elegance in Crisp White

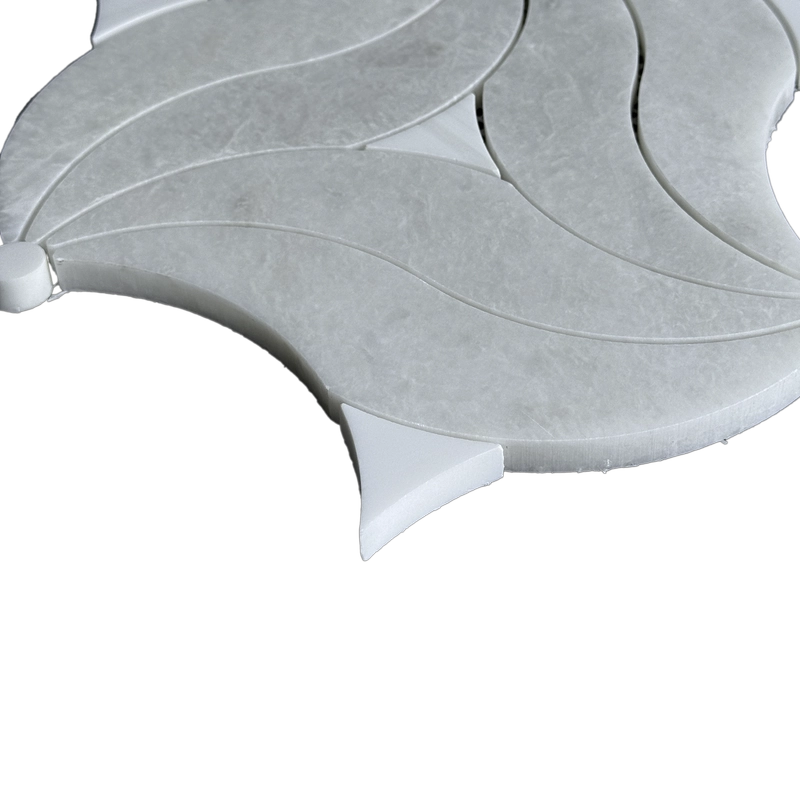
Add a contemporary touch to your space with the Rio Polished Marble Mosaic Tile. Featuring a linear mosaic design, this tile combines the natural beauty of Iceberg and Dolomite marbles in a polished, reflective finish. Its bright white tones and subtle veining bring a fresh, sophisticated look, ideal for kitchens, bathrooms, and accent walls.

The elongated mosaic layout introduces movement and rhythm without overwhelming the room. Perfect for horizontal or vertical installations, it enhances minimalist, modern, and transitional interiors alike.

Key Features

  • Material: Iceberg Marble & Dolomite Marble

  • Color: Bright white with soft veining

  • Finish: Polished – smooth, glossy surface

  • Pattern: Linear Rio mosaic with elongated tiles

  • Sheet Size: 7.8″ x 15.7″ (20 x 40 cm)

  • Thickness: 0.4″ (1 cm)

  • Mounting: Mesh-backed for easy, precise installation

  • Applications: Kitchen backsplashes, bathroom walls, fireplace surrounds, feature panels

Why Choose Rio Mosaic?
Its clean white palette and polished finish offer a timeless yet modern look. The combination of Iceberg and Dolomite marbles creates depth and variation, while the linear pattern adds subtle visual interest. A premium choice for effortless sophistication.

Packaging & Coverage

  • Sold per box – 5 mesh-mounted sheets

  • Coverage: approx. 4.3 sq.ft. per box

  • Weight: 28.8 lbs

  • Securely packaged to prevent transit damage

Weight5.23 lbs
Dimensions7.8 × 15.7 × 0.40 in
Collection

Iceberg Collection

Color

, ,

Design

Rio

Finish

Material

,

Size (inches)

Thickness

Usage Area

Backsplash, Commercial Interior Floors, Commercial Interior Walls, Outdoor Walls, Residential Interior Floors, Residential Interior Walls, Shower Floors, Shower Walls

Installation Guide – Rio Polished Marble Mosaic (Iceberg & Dolomite)

Step 1: Prepare the Surface
Ensure your substrate is clean, dry, and free of dust, oil, or debris. Level any uneven areas with a self-leveling compound. For wet locations such as showers or backsplashes, apply a waterproofing membrane for protection.

Step 2: Dry Layout & Planning
Lay out the mosaic sheets on the floor or wall before installation. This lets you preview the veining, ensure pattern alignment, and blend tiles from multiple boxes for consistent color. Maintain 1/16″–1/8″ spacing between sheets to accommodate the mosaic pattern.

Step 3: Apply Thin-Set Mortar
Recommended Adhesives:

  • Laticrete Glass Tile Adhesive

  • Mapei Adesilex P10 with Keraply

  • Ardex X5 White

Instructions:

  • Use a 3/16″ V-notch or 1/4″ square-notched trowel for even adhesive application.

  • Back-butter each mesh-backed sheet to ensure full adhesion and avoid voids under the intricate cuts.

  • Press gently using a grout float or rubber mallet to achieve uniform contact without damaging the waterjet pieces.

Step 4: Cutting & Adjustments

  • Use a wet saw with a diamond blade designed for marble.

  • Support the sheet while cutting to avoid dislodging individual pieces.

  • Smooth rough edges with a marble-safe polishing pad or stone file for a refined finish.

Step 5: Grouting

  • Pre-seal the tiles with a penetrating, marble-safe sealer before grouting to reduce absorption and haze.

  • Use non-sanded grout to protect the polished surface.

  • Apply grout diagonally with a rubber float, filling joints completely.

  • Wipe excess grout promptly with a damp sponge, and buff the surface with a dry microfiber cloth after 30–45 minutes.

Step 6: Final Sealing

  • Once grout has cured (typically 72 hours), apply a second coat of penetrating sealer for long-term protection.

  • Reapply periodically, particularly in areas exposed to moisture.

Maintenance Tips

  • Clean with pH-neutral, marble-safe products only. Avoid acidic or abrasive cleaners.

  • Wipe spills immediately to prevent staining or etching.

  • Inspect grout lines and reseal as needed to maintain the polished appearance.

Important Note
Because of the precision of waterjet cuts and natural variation in Iceberg and Dolomite marble, always dry-lay and inspect your tiles prior to permanent installation. Stonemarket USA is not liable for color variation or installation errors caused by site conditions or material handling.

Category
Category
Material
Material
Color
Color
Size
Size
Finish
Finish
Design
Design
Thickness
Thickness
Application
Usage Area
Request a Quote
Tell us briefly about your project, sq ft, and timing.