Loading... (Warehouse Local Time)
Mon–Fri: 9:00 AM – 6:00 PM |

Carrara White Pixel Mosaic Tile – Honed Marble with Modern Charm

Carrara White Pixel Honed Marble Mosaic Tile, klasik Carrara mermerinin zarafetini modern bir dokunuşla sunar. Küçük kare “pixel” parçalar, doğal gri damarlarla hareketlenen saf beyaz zemin üzerinde özenle kesilmiş olup, honed (mat) yüzeyiyle hem şık hem de sofistike bir görünüm sağlar. Bu mozaik tasarım, mutfak tezgah arkaları, banyo duş duvarları veya dekoratif paneller gibi hem geniş hem de detaylı yüzeylerde kusursuz bir uyum sunar. Küçük formatı sayesinde kıvrımlı veya karmaşık alanlarda bile kolayca uygulanabilir. Dayanıklı ve uzun ömürlü doğal taş yapısı, her projeye hem estetik hem de fonksiyonellik katarken, iç mekanlarda modern ve zamansız bir şıklık yaratır.

$17.49 / Piece

Item Code: MM131-24106 Category

540 Pieces in stock

Est. Coverage: 0.86 sq. ft. per piece   |   8.60 sq. ft. per box   |   464 sq. ft. per crate   |  Request Info
Note on Samples:
Sample pieces are small cut sizes, approximately 3" x 3" to 8" x 8", and intended for color and finish reference only.
If you need a full-size sample, please contact us.

Request Custom Pricing for Large Orders

Planning a large project? Orders over 500 sq. ft., full crates, or commercial applications may qualify for exclusive volume pricing. Reach out today and let us provide a custom quote tailored to your needs.

Request Volume Quote
  • Volume pricing available for qualified bulk orders.
  • We offer custom sizes, finishes, and crate-based shipments.

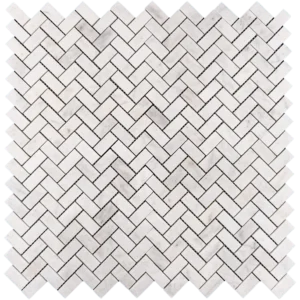
Carrara White Pixel Honed Marble Mosaic Tile – Modern Elegance

The Carrara White Pixel Honed Marble Mosaic Tile brings a contemporary twist to classic marble beauty. Crafted from premium Carrara marble, each small square features a soft white background accented with delicate gray veining. The honed finish creates a smooth, matte surface that exudes understated sophistication.

Its pixel mosaic design allows for creative and versatile layouts. Perfect for full-wall coverage or accent applications, it works beautifully in kitchen backsplashes, bathroom showers, and decorative panels. The small format also adapts seamlessly to curved or detailed surfaces, enabling flawless installations.

Designers and homeowners favor this tile for its clean geometry and timeless neutral palette. Each installation is unique due to the natural veining, adding subtle depth and movement. Whether combined with bold or soft finishes, Carrara White Pixel Honed Mosaic Tile enhances any interior with refined, modern charm.

Key Features:

  • Premium Carrara White marble with soft gray veining

  • Honed finish for a smooth, matte appearance

  • Pixel layout for versatile, modern designs

  • Durable and long-lasting natural stone

  • Ideal for walls, backsplashes, and accent surfaces

Applications:

  • Elegant kitchen backsplashes

  • Bathroom walls and shower enclosures

  • Geometric accent walls or decorative panels

  • Contemporary commercial interiors

Weight4 lbs
Dimensions10.4 × 12 × 0.40 in
Color

Finish

Thickness

Size (inches)

Collection

Carrara Collection

Design

Pixel

Material

Usage Area

Backsplash, Commercial Interior Walls, Outdoor Floors, Outdoor Walls, Residential Interior Walls, Shower Floors, Shower Walls

Installation Guide – Carrara White Pixel Honed Marble Mosaic Tile

Material Overview

  • Material: Premium Carrara White marble with a honed (matte) finish

  • Format: Square “pixel” chips (~3/8″–1″) mesh-mounted on ~12″x12″ sheets (some lots may be paper-faced)

  • Applications: Walls, backsplashes, shower floors, and light-traffic residential floors. Numerous grout joints provide extra traction.


Step 1: Surface Preparation

  • Ensure the substrate is clean, dry, and extremely flat (≤1/8″ in 10′; ≤1/16″ preferred for mosaics). Patch or skim-coat as necessary.

  • Approved substrates: cement backer board, properly cured concrete, or ANSI-compliant mortar bed.

  • Wet areas: install ANSI A118.10 waterproofing; shower floors should slope ¼” per foot to the drain.

  • Always use white setting materials under light marble to prevent shadowing or picture-framing.


Step 2: Dry Layout & Sheet Planning

  • Blend sheets from multiple boxes to distribute natural shade and veining evenly.

  • Snap level reference lines; confirm sheet orientation (arrows on the back, if present).

  • Trim mesh edges and stagger sheet seams so the grid is invisible.

  • Pre-fit around outlets and edges to ensure a seamless layout.


Step 3: Adhesive Application

  • Use white, polymer-modified thin-set rated for natural stone (ANSI A118.4/A118.15). Avoid premixed mastic, especially in wet areas.

  • Trowel recommendation: 3/16″ V-notch or 1/4″x3/16″ V-notch.

  • Key in with flat side, comb in one direction, then lightly flatten ridges to avoid telegraphing through small chips.

  • Work in manageable sections (10–15 min open time).


Step 4: Setting the Mosaic Sheets

  • Align sheets along reference lines; press with a rubber grout float or beating block for full contact and flat plane.

  • Remove any squeeze-through thin-set immediately with a damp sponge.

  • Correct lippage by lifting and resetting individual chips; back-butter if necessary.

  • For paper-faced sheets: set paper-side out, beat in, lightly dampen after initial grab (≈10–20 min), remove paper, and true up joints.


Step 5: Cutting & Detailing

  • Use a wet saw with a continuous-rim diamond blade suitable for marble. Tape cut lines to minimize chipping.

  • For small trims, use mosaic nippers sparingly and smooth exposed edges with a rubbing stone.

  • Finish exposed edges with stone trim, metal profiles, or coordinating moldings.


Step 6: Grouting (Honed Marble)

  • Allow thin-set to cure (≈24 hours).

  • Use unsanded grout for joints ≤1/8″ to protect polished surfaces. For wider joints, select fine-aggregate, marble-safe grout and test first.

  • Optionally, apply marble-safe grout release or pre-seal to reduce pigment uptake.

  • Pack joints diagonally with a rubber float; clean with minimal water to prevent washout or shading.


Step 7: Sealing

  • After grout cures (≈72 hours), apply a penetrating, breathable sealer approved for marble and grout.

  • Reapply periodically (every 1–2 years) depending on exposure and use.


Maintenance

  • Clean only with pH-neutral, non-abrasive stone cleaners. Avoid acids, bleach, vinegar, or abrasive pads.

  • In showers, wipe or squeegee dry to limit mineral deposits; use marble-safe descalers if necessary.


Movement Joints

  • Provide soft joints per TCNA EJ171 at perimeters, changes of plane, and structural joints.

  • Use 100% stone-safe silicone in corners and where tile meets dissimilar materials.


Important Notes & Disclaimer

  • Natural Carrara marble varies in tone and veining; dry-lay and blend sheets before installation.

  • Always use white thin-set under light marble to prevent shadowing.

  • Slight size and thickness tolerances are normal for mosaics.

  • Stonemarket USA is not responsible for substrate issues or improper installation. Professional installation is recommended.

Category
Category
Material
Material
Color
Color
Size
Size
Finish
Finish
Design
Design
Thickness
Thickness
Application
Usage Area
Request a Quote
Tell us briefly about your project, sq ft, and timing.